Эта статья морально устарела :( . Приглашаю продолжить ваше знакомство с Salesforce на нашем Форуме!
Согласитесь, было бы не плохо что бы у вас на SalesForce был свой календарь, с отмеченными событиями, что бы можно было планировать свое время более тщательно и продуктивно.
Тут можно посмотреть что в итоге должно получиться:
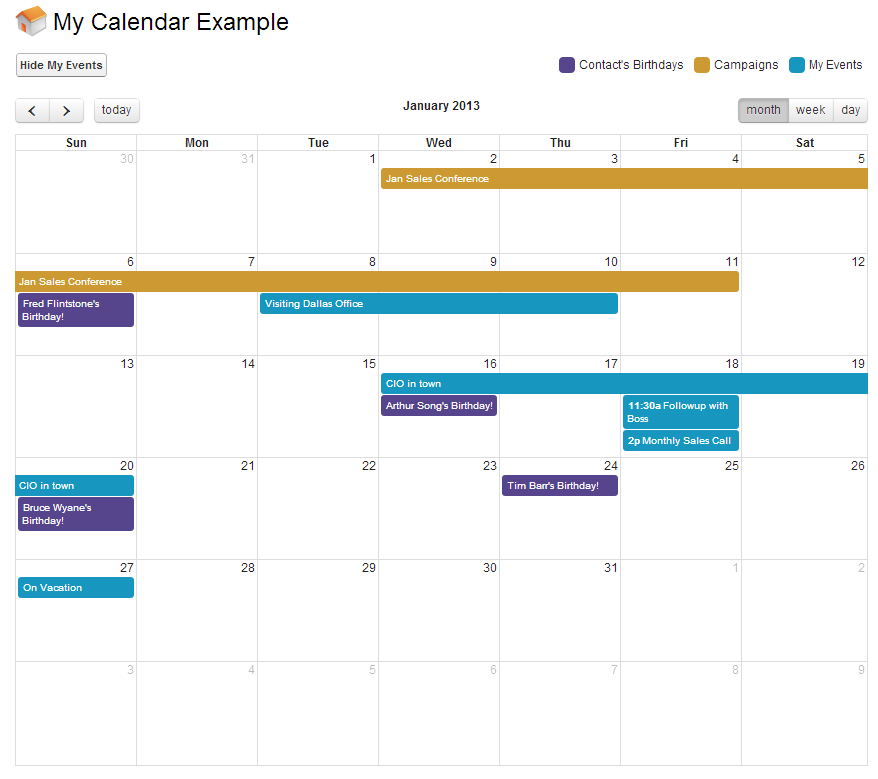
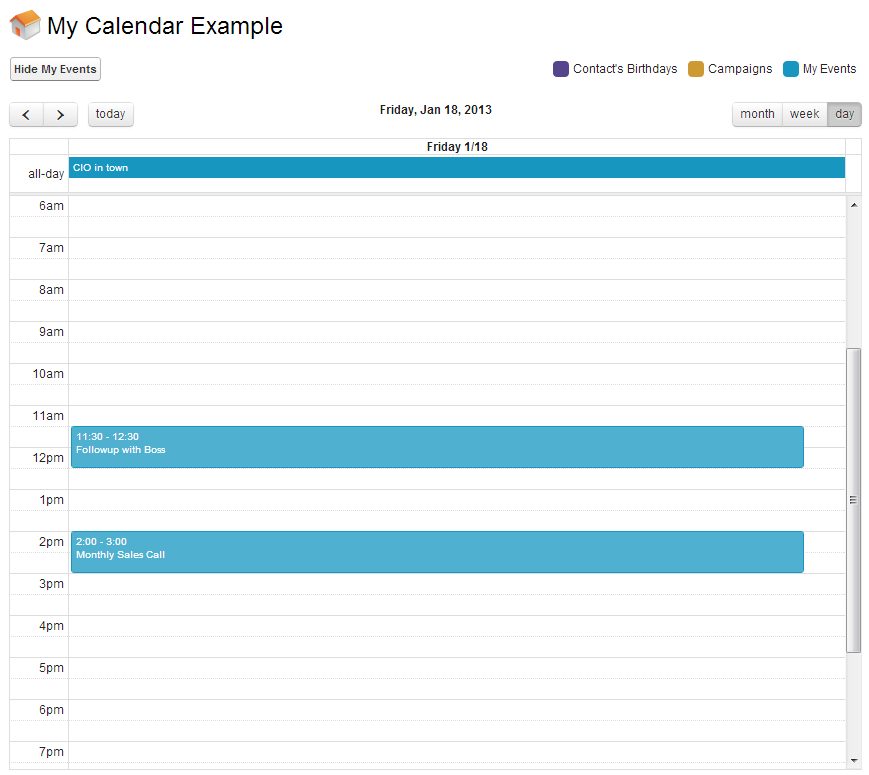
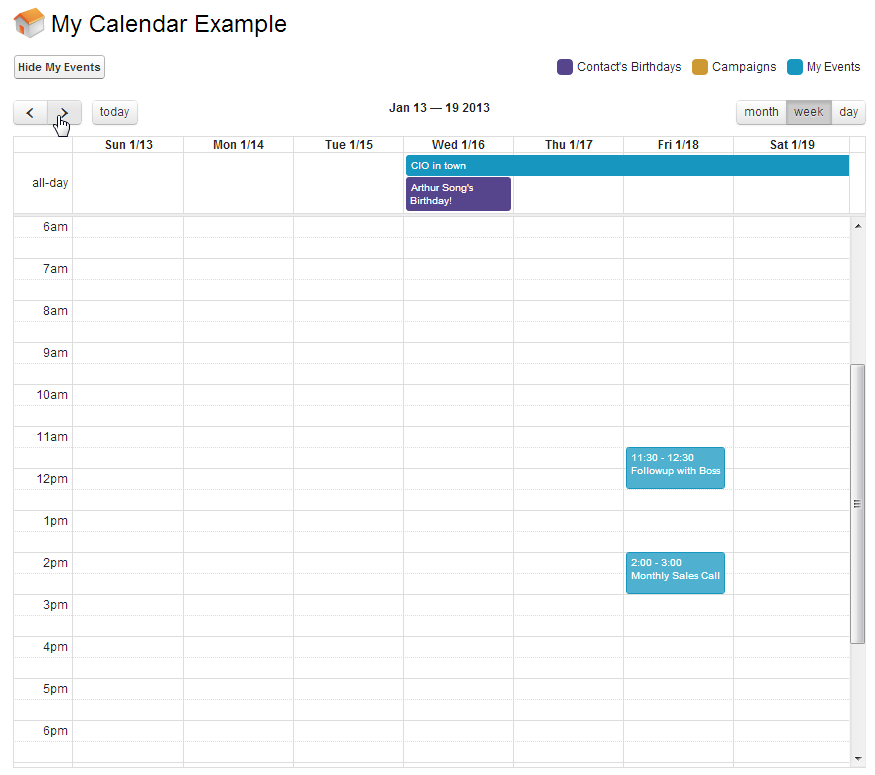
(Мы сможем просматривать в календаре записи как на конкретный день или неделю. там и на месяц)
Часть 1: Добавляем fullCalendar plugin в нашу Salesforce
Для начала нам надо загрузить fullCalendar код и добавить несколько файлов в Salesforce.com в качестве Static Resources (статических ресурсов).
1) Переходим по ссылке и скачиваем "fullcalendar-1.6.4.zip" (на момент написания - это последняя доступная версия)
2) Распакуйте архив из него вам будет необходимо взять 3 файла;
- "fullcalendar.min.js"

- "fullcalendar.css"

- "fullcalendar.print.css"
fullcalendar.min.js -  с именем - fullCalendarMinJS

fullcalendar.css  -  с именем - fullCalendarCSS

fullcalendar.print.css  -  с именем -  fullCalendarPrintCSS
<link href="{!$Resource.fullCalendarCSS}" rel="stylesheet" />

<link href="{!$Resource.fullCalendarPrintCSS}" rel="stylesheet" media="print" />
<script src="//ajax.googleapis.com/ajax/libs/jquery/1.10.1/jquery.min.js"></script>

<script src="//ajax.googleapis.com/ajax/libs/jqueryui/1.10.3/jquery-ui.min.js"></script>
<script src="{!$Resource.fullCalendarMinJS}"></script>
<script>

//We need to wrap everything in a doc.ready function so that the code fires after the DOM is loaded

$(document).ready(function() {

   //Call the fullCallendar method. You can replace the '#calendar' with the ID of the dom element where you want the calendar to go.

   $('#calendar').fullCalendar({

      header: {

      left: 'prev,next today',

      center: 'title',

      right: 'month,agendaWeek,agendaDay'

   },

   editable: false,

   events:

     [

     //At run time, this APEX Repeat will reneder the array elements for the events array

     <apex:repeat value="{!events}" var="e">

      {

        title: "{!e.title}",

        start: '{!e.startString}',

        end: '{!e.endString}',

        url: '{!e.url}',

        allDay: {!e.allDay},

        className: '{!e.className}'

      },

</apex:repeat>

]

});
<div id="calendar"></div>
//Class to hold calendar event data

public class calEvent{

public String title {get;set;}

public Boolean allDay {get;set;}

public String startString {get;set;}

public String endString {get;set;}

public String url {get;set;}

public String className {get;set;}

}
You may be wondering why I am using strings for the start and end dates. I just found it was easier to get the time zone/DST offset date times using theformat
APEX method rather than trying to figure it out in JavaScript. Also, note that there is a string property called "className". This is optional and can be used to add a CSS class to the event.
<apex:page controller="CalendarExample_Controller" action="{!pageLoad}">

<link href="{!$Resource.fullCalendarCSS}" rel="stylesheet" />

<link href="{!$Resource.fullCalendarPrintCSS}" rel="stylesheet" media="print" />


<script src="//ajax.googleapis.com/ajax/libs/jquery/1.10.1/jquery.min.js"></script>

<script src="//ajax.googleapis.com/ajax/libs/jqueryui/1.10.3/jquery-ui.min.js"></script>

<script src="{!$Resource.fullCalendarMinJS}"></script>


<script>

//We need to wrap everything in a doc.ready function so that the code fires after the DOM is loaded

$(document).ready(function() {

//Call the fullCallendar method. You can replace the '#calendar' with the ID of the dom element where you want the calendar to go.

$('#calendar').fullCalendar({

header: {

left: 'prev,next today',

center: 'title',

right: 'month,agendaWeek,agendaDay'

},

editable: false,

events:

[

//At run time, this APEX Repeat will reneder the array elements for the events array

<apex:repeat value="{!events}" var="e">

{

title: "{!e.title}",

start: '{!e.startString}',

end: '{!e.endString}',

url: '{!e.url}',

allDay: {!e.allDay},

className: '{!e.className}'

},

</apex:repeat>

]

});


});


</script>


<!--some styling. Modify this to fit your needs-->

<style>

#cal-options {float:left;}

#cal-legend { float:right;}

#cal-legend ul {margin:0;padding:0;list-style:none;}

#cal-legend ul li {margin:0;padding:5px;float:left;}

#cal-legend ul li span {display:block; height:16px; width:16px; margin-right:4px; float:left; border-radius:4px;}

#calendar {margin-top:20px;}

#calendar a:hover {color:#fff !important;}


.fc-event-inner {padding:3px;}

.event-birthday {background:#56458c;border-color:#56458c;}

.event-campaign {background:#cc9933;border-color:#cc9933;}

.event-personal {background:#1797c0;border-color:#1797c0;}

</style>


<apex:sectionHeader title="My Calendar Example"/>

<apex:outputPanel id="calPanel">

<apex:form >

<div id="cal-options">

<apex:commandButton value="{!IF(includeMyEvents,'Hide My Events','Show My Events')}" action="{!toggleMyEvents}"/>

</div>

<div id="cal-legend">

<ul>

<li><span class="event-birthday"></span>Contact's Birthdays</li>

<li><span class="event-campaign"></span>Campaigns</li>

<li style="{!IF(includeMyEvents,'','display:none')}"><span class="event-personal"></span>My Events</li>

</ul>

<div style="clear:both;"><!--fix floats--></div>

</div>

<div style="clear:both;"><!--fix floats--></div>

<div id="calendar"></div>

</apex:form>

</apex:outputPanel>

</apex:page>
public class CalendarExample_Controller {


public Boolean includeMyEvents {get;set;}

public list<calEvent> events {get;set;}


//The calendar plugin is expecting dates is a certain format. We can use this string to get it formated correctly

String dtFormat = 'EEE, d MMM yyyy HH:mm:ss z';


//constructor

public CalendarExample_Controller() {

//Default showing my events to on

includeMyEvents = true;

}


public PageReference pageLoad() {

events = new list<calEvent>();

//Get Contact's Birthdays

for(Contact cont : [select Id, Birthdate, FirstName, LastName from Contact where Birthdate != null]){

//here we need to replace the birth year with the current year so that it will show up on this years calendar

DateTime startDT = datetime.newInstance(Date.Today().Year(),cont.Birthdate.Month(), cont.Birthdate.Day());

calEvent bday = new calEvent();


bday.title = cont.FirstName + ' ' + cont.LastName + '\'s Birthday!';

bday.allDay = true;

bday.startString = startDT.format(dtFormat);

//Because this is an all day event that only spans one day, we can leave the send date null

bday.endString = '';

bday.url = '/' + cont.Id;

bday.className = 'event-birthday';

events.add(bday);

}


//Get Campaigns

for(Campaign camp : [select Id, Name, StartDate, EndDate from Campaign where IsActive = true]){

DateTime startDT = camp.StartDate;

DateTime endDT = camp.EndDate;

calEvent campEvent = new calEvent();


campEvent.title = camp.Name;

campEvent.allDay = true;

campEvent.startString = startDT.format(dtFormat);

campEvent.endString = endDT.format(dtFormat);

campEvent.url = '/' + camp.Id;

campEvent.className = 'event-campaign';

events.add(campEvent);

}


//Get my Events if we have selected the correct option

if(includeMyEvents){

for(Event evnt: [select Id, Subject, isAllDayEvent, StartDateTime, EndDateTime from Event where OwnerID = :UserInfo.getUserId()]){

DateTime startDT = evnt.StartDateTime;

DateTime endDT = evnt.EndDateTime;

calEvent myEvent = new calEvent();


myEvent.title = evnt.Subject;

myEvent.allDay = evnt.isAllDayEvent;

myEvent.startString = startDT.format(dtFormat);

myEvent.endString = endDT.format(dtFormat);

myEvent.url = '/' + evnt.Id;

myEvent.className = 'event-personal';

events.add(myEvent);

}

}

return null;

}


public PageReference toggleMyEvents() {

if(includeMyEvents){

includeMyEvents = false;

}

else{

includeMyEvents = true;

}

pageload();

return null;

}


//Class to hold calendar event data

public class calEvent{

public String title {get;set;}

public Boolean allDay {get;set;}

public String startString {get;set;}

public String endString {get;set;}

public String url {get;set;}

public String className {get;set;}

}

}